Some of my reader already know: A few months ago my wife and me bought a 3d printer, the Prusa MK3S+ (yes, she was pushing this). We decided for the self assembly version, which did not only save us some €, but while we assembled the device we learned a lot about its construction. By the way, the self-assembly handbook were the best printed instructions I ever saw, much recommended.
While my wife focuses on designing impressive organic 3d models with Blender, I envisioned my main usage for tinkering and maker products. It turns out, the printer itself is also a great target for tinkering 🙂 Today, I reached a major milestone, hence I thought about making this short writeup, as inspiration for others and reminder for future self.
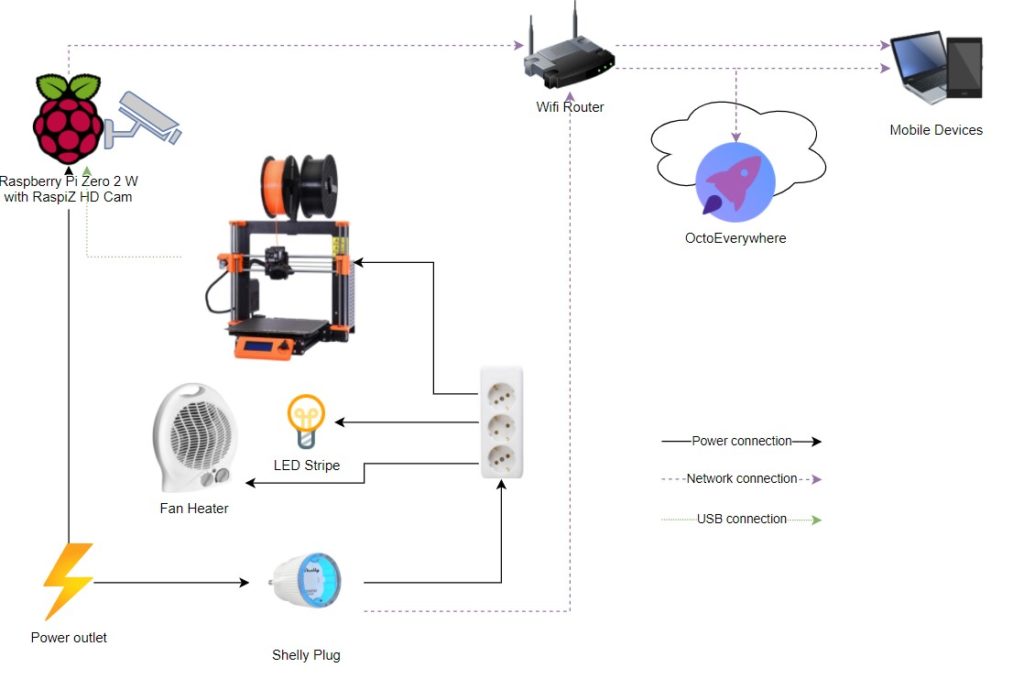
One wiring diagram says more than thousands words:
Some bullet points:
- The Raspberry Pi Zero 2 W (just got available a few weeks back) is always connected to the power and wifi of course.
- The Raspi runs current versions of OctoPi/OctoPrint with some fancy plugins, so the typical operation and monitoring can all happen from any device with a browser.
- The Raspi is equipped with the RaspiZ HD Cam.
- I had some issues with the Raspi file system getting corrupted when there was power loss, leading to unavailability from the network. Which was kind of a dilemma, because how could I turn off this headless device without being able to connect via SSH and shutdown? The solution is an extra hard button soldered to the Raspi’s GPIO pins. When this button gets clicked, the Raspi is running its proper shutdown sequence (which should not be required in many cases).
- As the images/videos from the camera where too dark even with the room lights on, I added an LED stripe behind the camera so its illuminating the printer
- The printer is in a room which can get quite cold in winter, and low temperature stops the printer from being available (some safety thresholds kick in), we use a fan heater to get the temperature to the required minimum in the room. (Yes I am aware that the printer should be stored at room temperature the whole year, but we dont have space for that. Something to fix later.)
- The printer, heater and LEDs can all be turned on and off via a remote controllable Shelly Plug. The nice perk here is that there are plugins to make the power switching available in the OctoPrint UI (PSU Control and its Shelly sub-plugin)
- OctoPrint is directly available from the LAN, and for internet accessibility I recently started to use OctoEverywhere.
I think its a nice setup so far, and still more ideas to improve. Its not recommended to use the 3d printer in absence, even with remote monitoring. I am thinking about adding some fire/smoke detection device to the setup.